Tuesday, March 27, 2018

TTMT #36 Is it a basket or a hat?


Laura-Lynn from the Mom & Pop Quilt Shop  on YouTube showed us how to make these fabric bowls for her weekend project. It looked like fun so I decide to give it a try. There's a similar sew along going on over on Instagram. There's a rug pattern that uses a jellyroll and basically the same process. I'm sure it would be a non working rug because I can't see that it would last very long if people walked on it. It's like walking on a quilt.


You can watch the video for all the details but basically you take strips of fabric and strips of batting and sew them together. Then you sew them into a basket like those fabric covered rope bowls that come in and out of popularity.


I used about 3/4 of my fabric strips and made this bowl. You can see me modeling it in my video ;)


I used the rest to make a long oval basket. Since there is only batting and fabric the sides are obviously going to be floppy but I just wanted to see what it would look like. As a larger basket it is amazing. I love the soft floppy sides but if you need to have something with some structure then you would be better off making the rope version. I would like to find something in between the two because I have a fun idea that I would like to try. Maybe some type of cording. I'll have to wander around Jo-Ann's and see what I can find.
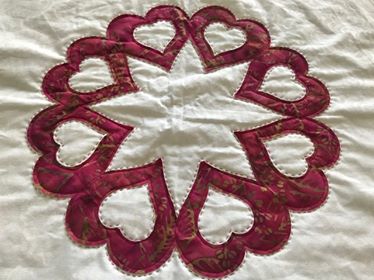


Here's a close up of my Hearts a Flutter wall hanging that I am working on. These are the beautiful hearts from Barb. I love practicing my stitches on this wall hanging.


Miss Mocha likes to help.


My red, white, and blue hexies are ready for the next step.


43 more crumb blocks added to the pile.


Now I have 133 crumb blocks. I like to trim them to 6.5". These will be fun to play with.


Here's a pic of some of the ones I made this past week.


Friday, March 23, 2018

Sew With Me Stocking Blocks Version #2


This week I have another stocking quilt block design for you. This block was used as part of a private swap on Quilting Around the World in 2015. I haven't been able to find an online version but if you know where it is from please leave a comment so I can properly link to the design. Thanks!


Stocking cutting sizes:

A.   5.5" x 8.5"
B.   1.5" x 4.5"
 C.  1.5" x 12.5"
                         D.  1.75" squares (3 per block)
E.  2.5" x 6.5"
 F.  4.5" x 10.5"

You will draw a diagonal line corner to corner down the center of all D squares.  I recommend waiting to cut piece C until the rest of the block is pieced and pressed. Or, cut a strip the width of fabric by 1.5" wide and sew to the block and trim excess then use left over length to add to the next block.


For those that like my crazy sketches here you go. I did like cutting out my pieces and laying them on the almost exact sized paper version. It kept all the little pieces in order. I really need to make some mini design boards.


Wednesday, March 21, 2018

A little knitting update


I finished my fingerless mitts. I used this pattern except I made the cuffs longer before starting the pattern mostly because I didn't read the pattern correctly lol. They actually have a left and right hand and they fit so well. They are both made from the same skein of RedHeart Stripes Fruity Stripes.


American Flag scarf made with RedHeart Super Saver Americana no pattern


Menta & Liquirizia Shawl made with hand dyed mini skeins


Antler cardigan made using Mary Maxim sport weight yarn


Robbie's socks - I use this pattern but I just knit them vanilla.

Tuesday, March 20, 2018

TTMT #35 Christmas Crafting


You've already seen all my Christmas stocking project but here's a picture of my finished mitts. Come back tomorrow to see my current knitting projects.


Do you work on Christmas year round or do you wait until Thanksgiving to get started? I love Christmas crafting so I make things year round.