Laura-Lynn from the Mom & Pop Quilt Shop on YouTube showed us how to make these fabric bowls for her weekend project. It looked like fun so I decide to give it a try. There's a similar sew along going on over on Instagram. There's a rug pattern that uses a jellyroll and basically the same process. I'm sure it would be a non working rug because I can't see that it would last very long if people walked on it. It's like walking on a quilt.
You can watch the video for all the details but basically you take strips of fabric and strips of batting and sew them together. Then you sew them into a basket like those fabric covered rope bowls that come in and out of popularity.
I used about 3/4 of my fabric strips and made this bowl. You can see me modeling it in my video ;)
I used the rest to make a long oval basket. Since there is only batting and fabric the sides are obviously going to be floppy but I just wanted to see what it would look like. As a larger basket it is amazing. I love the soft floppy sides but if you need to have something with some structure then you would be better off making the rope version. I would like to find something in between the two because I have a fun idea that I would like to try. Maybe some type of cording. I'll have to wander around Jo-Ann's and see what I can find.
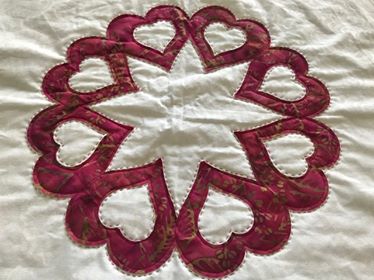
Here's a close up of my Hearts a Flutter wall hanging that I am working on. These are the beautiful hearts from Barb. I love practicing my stitches on this wall hanging.
Miss Mocha likes to help.
My red, white, and blue hexies are ready for the next step.
43 more crumb blocks added to the pile.
Now I have 133 crumb blocks. I like to trim them to 6.5". These will be fun to play with.
Here's a pic of some of the ones I made this past week.
This week I have another stocking quilt block design for you. This block was used as part of a private swap on Quilting Around the World in 2015. I haven't been able to find an online version but if you know where it is from please leave a comment so I can properly link to the design. Thanks!
Stocking cutting sizes:
A. 5.5" x 8.5"
B. 1.5" x 4.5"
C. 1.5" x 12.5"
D. 1.75" squares (3 per block)
E. 2.5" x 6.5"
F. 4.5" x 10.5"
You will draw a diagonal line corner to corner down the center of all D squares. I recommend waiting to cut piece C until the rest of the block is pieced and pressed. Or, cut a strip the width of fabric by 1.5" wide and sew to the block and trim excess then use left over length to add to the next block.
For those that like my crazy sketches here you go. I did like cutting out my pieces and laying them on the almost exact sized paper version. It kept all the little pieces in order. I really need to make some mini design boards.
These are the 7 plus my two stocking blocks from the mystery box of fabric. My blocks are the bottom left and top right stockings.
The blocks are so quick and easy to make I made another set of 9 thinking I would make another wall hanging. Then I changed my mind. No surprise there, right? I made 5 left facing and 4 right facing blocks. The 4 right facing have green cuffs and I turned them into a mini quilt/wall hanging.
I took 4 of the left facing stockings which all have a red cuff and made an alternating table runner. This way no matter what side you sit on you can have stockings that are facing the correct way.
I did save one of the left facing stockings to make into a pillow cover. This one is my favorite so that's why I chose this one.
I sketched out the block design and you can find it here. Check back next week because I found another fun design to make.
I decided to sew the stockings in a basic 9 patch layout with a 1.5" sashing between the blocks and as a border.
This is the pattern I reverse engineered. It's a basic and easy block to sew together.
These are the two blocks I made. Right now I plan on using the green bells fabric as the binding.
You won't see these in the video but I decided to make another 9 patch but using my Christmas fabric stash. Like my socks? They're nice and toasty warm. It's been in the 40's in the morning lately. Brrrr! At least down here in Florida it's cold.
My oldest, Justin, has a coworker/friend that is a Disney fanatic. Kelsey has a yearly pass to Disney World and definitely gets her money worth. She probably goes every month if not more often. She goes to all the special events like Mickey's birthday bash and Halloween. She goes to events I've never heard of like Pin days. Something about going around the park to the different characters and answering their question to earn a special character pin. No clue. Kelsey enjoys so it and that's all that really matters.
Except of you're a die hard Disney fan you have to dress the part. One of things you need are Mickey Ears. I remember those fuzzy plastic black hats with the big fuzzy black ears and maybe your name embroidered on the front - for a few extra dollars of course.
Now there are headbands with fabric ears and little doodads glued on. This is where I step in. Kelsey buys all the supplies and I make her ears for each event. At first it was a pain and I didn't want to ever make another pair of ears for the rest of my life but then like most things they got easier with each set of ears.
URSULA
This time I made Lilo & Stitch and Ursula ears. Kelsey ordered the bows online I believe so she will need to add those herself. I believe she wore her new Ears this past Tuesday. Last time I made Villain ears for her everyone she came across wanted to know where she bought her ears. I guess I made them right.
This time I filmed a sew with me non-tutorial type video. This way you can see how I make my ears and if I forget I can watch the video and be reminded.
This video is part of my Scraps - everyone's got them series over on my YouTube channel. In this video I show you how I like to sew some of my fabric scraps to adding machine tape. In a later video I'll show you how I use those scraps to make quilt blocks, borders, and other projects.
I recently purchased some room darkening/heat blocking curtains. It was less expensive to purchase the longer curtain panel and cut it down to fit two of my windows. Come hang out with me while I shorten and hem my new curtains.
Also, my latest podcast episode is available. I've been working on a few different projects these past two weeks. It's Spring allergy season here in SW Florida and my eyes do not look happy.
My name is Robin. I have always loved to make things with my hands. This love has grown over the years and has broadened as it has grown. I love trying new ideas and looking for new and fun things to craft. I enjoy the challenge of designing my own patterns. I like to make things that bring a smile to people young and old. I have always believed that a handmade item will be remembered and loved for a lifetime therefore I put lots of love into each item I make.