Tuesday, March 27, 2018

TTMT #36 Is it a basket or a hat?


Laura-Lynn from the Mom & Pop Quilt Shop  on YouTube showed us how to make these fabric bowls for her weekend project. It looked like fun so I decide to give it a try. There's a similar sew along going on over on Instagram. There's a rug pattern that uses a jellyroll and basically the same process. I'm sure it would be a non working rug because I can't see that it would last very long if people walked on it. It's like walking on a quilt.


You can watch the video for all the details but basically you take strips of fabric and strips of batting and sew them together. Then you sew them into a basket like those fabric covered rope bowls that come in and out of popularity.


I used about 3/4 of my fabric strips and made this bowl. You can see me modeling it in my video ;)


I used the rest to make a long oval basket. Since there is only batting and fabric the sides are obviously going to be floppy but I just wanted to see what it would look like. As a larger basket it is amazing. I love the soft floppy sides but if you need to have something with some structure then you would be better off making the rope version. I would like to find something in between the two because I have a fun idea that I would like to try. Maybe some type of cording. I'll have to wander around Jo-Ann's and see what I can find.


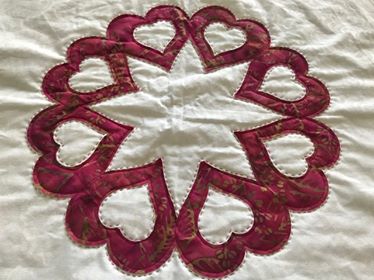
Here's a close up of my Hearts a Flutter wall hanging that I am working on. These are the beautiful hearts from Barb. I love practicing my stitches on this wall hanging.


Miss Mocha likes to help.


My red, white, and blue hexies are ready for the next step.


43 more crumb blocks added to the pile.


Now I have 133 crumb blocks. I like to trim them to 6.5". These will be fun to play with.


Here's a pic of some of the ones I made this past week.


Friday, March 23, 2018

Sew With Me Stocking Blocks Version #2


This week I have another stocking quilt block design for you. This block was used as part of a private swap on Quilting Around the World in 2015. I haven't been able to find an online version but if you know where it is from please leave a comment so I can properly link to the design. Thanks!


Stocking cutting sizes:

A.   5.5" x 8.5"
B.   1.5" x 4.5"
 C.  1.5" x 12.5"
                         D.  1.75" squares (3 per block)
E.  2.5" x 6.5"
 F.  4.5" x 10.5"

You will draw a diagonal line corner to corner down the center of all D squares.  I recommend waiting to cut piece C until the rest of the block is pieced and pressed. Or, cut a strip the width of fabric by 1.5" wide and sew to the block and trim excess then use left over length to add to the next block.


For those that like my crazy sketches here you go. I did like cutting out my pieces and laying them on the almost exact sized paper version. It kept all the little pieces in order. I really need to make some mini design boards.


Wednesday, March 21, 2018

A little knitting update


I finished my fingerless mitts. I used this pattern except I made the cuffs longer before starting the pattern mostly because I didn't read the pattern correctly lol. They actually have a left and right hand and they fit so well. They are both made from the same skein of RedHeart Stripes Fruity Stripes.


American Flag scarf made with RedHeart Super Saver Americana no pattern


Menta & Liquirizia Shawl made with hand dyed mini skeins


Antler cardigan made using Mary Maxim sport weight yarn


Robbie's socks - I use this pattern but I just knit them vanilla.

Tuesday, March 20, 2018

TTMT #35 Christmas Crafting


You've already seen all my Christmas stocking project but here's a picture of my finished mitts. Come back tomorrow to see my current knitting projects.


Do you work on Christmas year round or do you wait until Thanksgiving to get started? I love Christmas crafting so I make things year round.


Sunday, March 18, 2018

Show & Tell Christmas stocking projects


These are the 7 plus my two stocking blocks from the mystery box of fabric. My blocks are the bottom left and top right stockings.


The blocks are so quick and easy to make I made another set of 9 thinking I would make another wall hanging. Then I changed my mind. No surprise there, right? I made 5 left facing and 4 right facing blocks. The 4 right facing have green cuffs and I turned them into a mini quilt/wall hanging.


I took 4 of the left facing stockings which all have a red cuff and made an alternating table runner. This way no matter what side you sit on you can have stockings that are facing the correct way.


I did save one of the left facing stockings to make into a pillow cover. This one is my favorite so that's why I chose this one.

I sketched out the block design and you can find it here.  Check back next week because I found another fun design to make.


Friday, March 16, 2018

Christmas Stocking Quilt Block


I decided to sew the stockings in a basic 9 patch layout with a 1.5" sashing between the blocks and as a border.


This is the pattern I reverse engineered. It's a basic and easy block to sew together.


These are the two blocks I made. Right now I plan on using the green bells fabric as the binding.


You won't see these in the video but I decided to make another 9 patch but using my Christmas fabric  stash.  Like my socks? They're nice and toasty warm. It's been in the 40's in the morning lately. Brrrr! At least down here in Florida it's cold.


Tuesday, March 13, 2018

TTMT #34 Not Much Crafting MoJo this week


I have just not been feeling creative for a couple weeks now. Someone mentioned it was probably from sitting at the hospital with my son. They suggested that it might take a couple weeks to reset my creativity. I hope it comes back soon but until then I will just keep plugging on and working on little things.


These are the second set of 9 patch blocks that I am sending to the Mom and Pop Quilt Shop  for Laura-Lynn's charity quilts.  This time I remembered to alternate where I placed the main fabric.


These are the next set of crumb blocks that I put together. I think for now I am done with crumbs. Next time I will work on some string blocks just to change things up a bit. I'm getting bored with all the sewing, and ironing, and trimming. It gets a bit tough on the shoulder.


Here's a closeup of my Hearts a Flutter wall hanging. I enjoyed the little hand quilting I did and I really love how it's looking so far. I've always enjoyed handwork. 


Tuesday, March 6, 2018

TTMT #33 It's been a crumb-y kind of week


As creators some days we know exactly what we want to create and there are days/weeks where we feel lost at sea. We're just bobbing along with no destination on the horizon. This week I was lost and just bobbing along. I worked on a couple different projects, cleaned and rearranged my craft room (again) and played in the scrap bin. I have been in this new craft space for less than a year so I am still trying different arrangements to see what I like. Right now I am loving this new configuration. It needs a few small tweaks while figure out where I want little things like scissors and rulers but I like where the furniture is at least for now lol.


Stocking UFO


Skinny table runner UFO


What my cutting table looked like partway through the crumb sewing process.


The 9 crumb blocks that I had sewn together before lunch on Monday.


By the end of Monday I had a total of 22 crumb blocks sewn together. The blocks are 6.5" unfinished. I will most likely border them in white so that they don't all blur together in a quilt top.


A couple years back I received a very generous surprise mystery package of fingering weight yarns. In that package was a shawl pattern and the above mini skeins.  I had not made the shawl yet because I just wasn't sure if I liked it. The mini skeins all look great together so I decide to use them on the Menta & Liquirzia shawl pattern instead. I have a couple mini skeins in my stash that will coordinate in case I run out.  I was going to make this shawl in greys, turquoise, and a splash of red but I would have to wait until the budget allows new yarn purchases and I just didn't want to wait. After I finish knitting it with these minis if I still want one in greys etc. then I can always knit it again later. At least this way I can knit the design now since I like it so much.


Saturday, March 3, 2018

Froggin' Party

Sometimes we fall out of love for a project we are working on.Sometimes they just don't work out they way we had hoped. Sometimes we chose the wrong yarn or wrong color. No matter the reason there comes a time when we just need to frog some projects. This week I went through my project bags and decided whether  I wanted to keep working on each one or frog it.


Here's what I frogged and why....


This was going to be a zebra. I love the the multi-color stripey yarn but I was just not happy changing the colors every row. If I didn't change the colors then it would just be a horse and not a zebra. I haven't knit on it in several months so I frogged it.


Technically I didn't do any frogging with this project. I just decided not to make anymore. I was knitting mittens and stockings for ornaments or advent calendars. The project bag was holding knitting needles, scissors, stitch markers, etc. Now it's empty and back in rotation.


This was going to be a pair of fingerless mitts for me. I completely forgot I had started these. I have different pair on the needles now so I frogged this cuff and put the yarn back in the stash. There was a coupon in the project bag that expired June 2016. Gives you an idea of how long they were lost. 


Just three projects. That's really not bad at all. I do have a couple new projects I want to cast on but for now I'll wait. I want to get a couple more bags emptied but this time I want them finished and not frogged. My needles will never be completely empty and I'm okay with that.